Made at Home: Taste Buds on a Budget Series! Part 3: Freezer Friendly
Join me as I partner with University of Georgia FCS agent Becca Stackhouse to bring you a new food budgeting series. Learn ways to save money on food as you plan, shop, prepare, and entertain!
Made at Home: Taste Buds on a Budget Series! Part 3: Freezer Friendly
by Katie Cullum
You may think you need a separate freezer to save money but you really don't. What you really need to do is our first tip!
Plan Ahead!
Prepare Ingredients
- Put out paper plates (last time I got 10 pounds of ground beef, I used 2 pounds for meatloaf and then cooked the other 8 pounds) - so 8 paper plates (if you want to throw away less, you can use regular plates).
- Cover paper plates with paper towels to help drain grease
- Cook ground beef to 160 degrees F. I usually have a few skillets on the stove.
- As the ground beef in one skillet gets done, I put it on paper plates and then add more to that skillet.
- When the ground beef is all cooked, you may need to take some cooked beef on one plate and add to another plate. You want all the plates to be about the same amount.
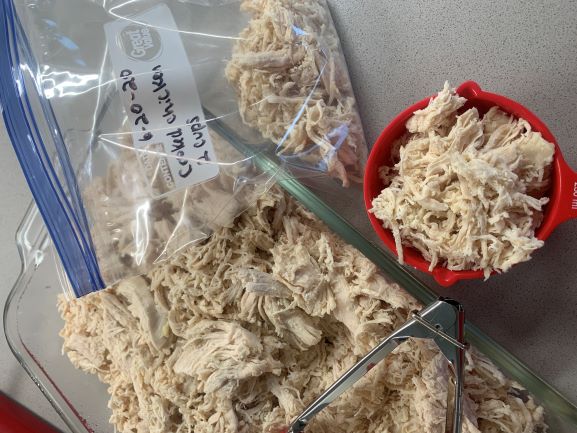
To get shredded chicken, check out my video:
- Cook to 165 degrees F.
- Shred in a stand mixer (if you have one - otherwise use 2 forks to shred or use a knife to dice)
- Portion into 1, 2, 3 or 4-cup portions. I mostly do 1-2 cups or 3 cups. This is about what you'd use in a recipe.
- 1 cup of cubed or shredded chicken is about 5 ¼ ounces of cooked, deboned chicken.
- 1 cup of cubed or shredded chicken is also about 1 boiled chicken breast.
Freeze an Extra Batch
Another way to save time and money is to double a recipe. Casseroles, soups, stews, chilies, and lasagnas are great for this. Just double the recipe and freeze the extra. Bonus points if you got the protein or other ingredients on sale! If I make lasagna, I want to make several batches! It's not much more work to layer a couple of dishes rather than just one.
If you have a small freezer, you can just freeze the leftover from one batch. This will take up less room and you can still use it when you need it.
Dump Meals
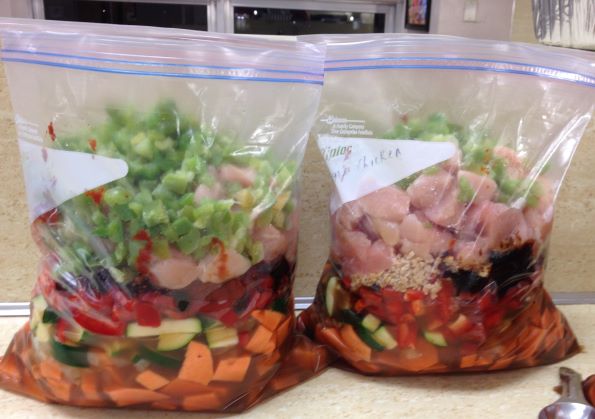
I really like dump meals. It sounds weird but it's pretty easy. If you buy a big package of raw chicken and don't want to cook it (see above), then you can probably make a dump meal or two. Basically, you can put poultry or meat into a bag, add a sauce, add vegetables, and then freeze the bag. Thaw it overnight, and then cook for dinner. I like to use my slow cooker but you can also use your electric pressure cooker or the oven. If you're worried about the safety or how vegetables will do, check out this article from Clemson University. I even tested this out with a Freezer Friends class. I had 2 batches of a recipe. With one batch, I blanched the vegetables before freezing. With the other batch, I just threw the vegetables in raw. All but one of the participants preferred the blanched vegetable recipe. Blanching may add a little prep time, but the end result is a better quality recipe.
Food Safety
You want to end up with good food. So take care of it before it goes into the freezer!
- Use freezer-safe packaging. That empty butter container may be convenient but it's not really freezer safe. Use freezer bags, not just storage bags.
- Label, label, label. You may think you'll remember what that hunk of meat is, but months from now it will look different. Use freezer tape (if needed) and permanent markers. I like the include the name of the food (specifics like shredded chicken or teriyaki chicken), the packaging date, how much (such as 2 cups or 1 pound), and cooking instructions if needed.
- Freeze quickly - to save space in my freezer, I like to use freezer bags and then lay them flat. They take up less room (you can stack then AFTER they are frozen) and they freeze/thaw quickly. But make sure you spread them out so they can freeze quickly and then stack.
- Thaw safely - please don't ever thaw meat or poultry on the countertop. 50-65% of
consumers thaw raw meat, fish or poultry incorrectly (at room temperature and/or in
stagnant water). Don't be a statistic! There are 3 ways to safely thaw food:
- in the refrigerator (the easiest but it takes longer)
- in the microwave (quicker but you need to cook the food immediately)
- cold water that is changed every 30 minutes for whole turkeys or large pieces of poultry/meat
or cold running water for smaller items
 Go 40 degrees or below! Check out more resources at fightbac.org.
- Temperatures - check your refrigerator and freezer temps. The fridge should be 40 degrees or lower and the freezer should be at 0 degrees. But don't forget the cooking temperatures! If you're cooking meat or poultry after freezing, it still needs to be thoroughly cooked. Check this chart for the latest temperatures.
For a great one-stop handout, check out this information from the University of Nebraska Extension.
Vegetable Lasagna with Becca
1 large Egg
15 Ounces Part-Skim Ricotta Cheese
1 Package Baby Spinach
6 - 8 Ounces Portobello Mushroom
1 Small Zucchini
28 Ounces Diced Tomatoes
28 Ounce Crushed Tomatoes
3 Cloves Garlic
1 tbps Italian Seasoning
1 tsp Onion Powder
1/2 Salt
1/8 tsp Crushed Red Pepper
8 - 10 Whole Grain Lasagna Noodles
1 1/2 Cup Shredded Mozzarella
- Combine egg, ricotta, spinach, mushrooms and zucchini in a large bowl.
- Combine crushed and diced tomatoes and their juice, garlic, Italian seasoning, onion powder, salt, and crushed red pepper (if using) in a medium bowl.
- Generously coat a 6-quart or larger slow cooker with cooking spray. Spread 1½ cups of the tomato mixture in the slow cooker. Arrange noodles over the sauce, overlapping them slightly and breaking into pieces to cover as much of the sauce as possible. Spread half of the ricotta-vegetable mixture over the noodles and firmly pat down, then spoon on 1½ cups sauce and sprinkle with 1/2 cup mozzarella.
- Repeat the layering one more time, starting with noodles. Top with a third layer of noodles. Evenly spread the remaining tomato sauce over the noodles.
- Set aside the remaining 1/2 cup mozzarella in the refrigerator.
- Put the lid on the slow cooker and cook on High for 3 hours or on Low for 5 hours. Turn off the slow cooker, sprinkle the reserved ½ cup of mozzarella on the lasagna, cover and let stand for 10 minutes to melt the cheese.
Check back to learn how to entertain on the budget (no need to blow the budget when we can entertain again!).
Made at Home: Taste Buds on a Budget - check out the whole series!