Camping in the Great Backyard

Camping in the Great Backyard
by Original content: Valerie Turner, Monroe County | Adapted for blog: Katie Cullum, White County
Do you love the outdoors and want to spark that same love in your kids? Want to do something as a family but are out of ideas and short on funds? A camping trip just might be the answer you are looking for. I am not talking about a camping trip where you buy lots of stuff, pack for days, travel, camp, and return home to clean and put all away. This camping trip is to your backyard, where minimal equipment and experience are required, and fun is just outside your backdoor.
When I was a kid, one of my favorite things was a backyard camp out. We would take a couple of old sheets, to throw over the clothesline, our sleeping bags, some snacks, and away we would go. My mom never counted it as real camping because we kept running in and out of the house to get stuff we wanted, but we did.
Backyard camping is something anyone can do no matter the size of your yard or camping experience. It is a great way to encourage kids and adults to get outdoors and experience nature in a new way. Although camping in the backyard may not seem like real camping to the experienced camper, it can be the small venture that leads to many adventures over a lifetime.
As with any camping trip, planning is key to success. When you start to plan, think REPS – Rules, Eating, Playing, and Sleeping. Rules are the last thing most kids want to think about, but it is important to set a few basic rules as well as review and learn some important ones. The first thing to remember is you are supposed to be camping, not sitting outside on playing games on your tablet or checking your texts on your phone. Let the indoors stay indoors for the duration of your campout. Other things to consider: neighborhood guidelines concerning fires; dangers that can be found in the backyard like snakes or bees, and are we ‘totally’ camping or using the toilet indoors. Some rules may be learned throughout the campout, depending on how in-depth of a campout you are embarking on. Discussing these small considerations in advance can reduce big headaches later.
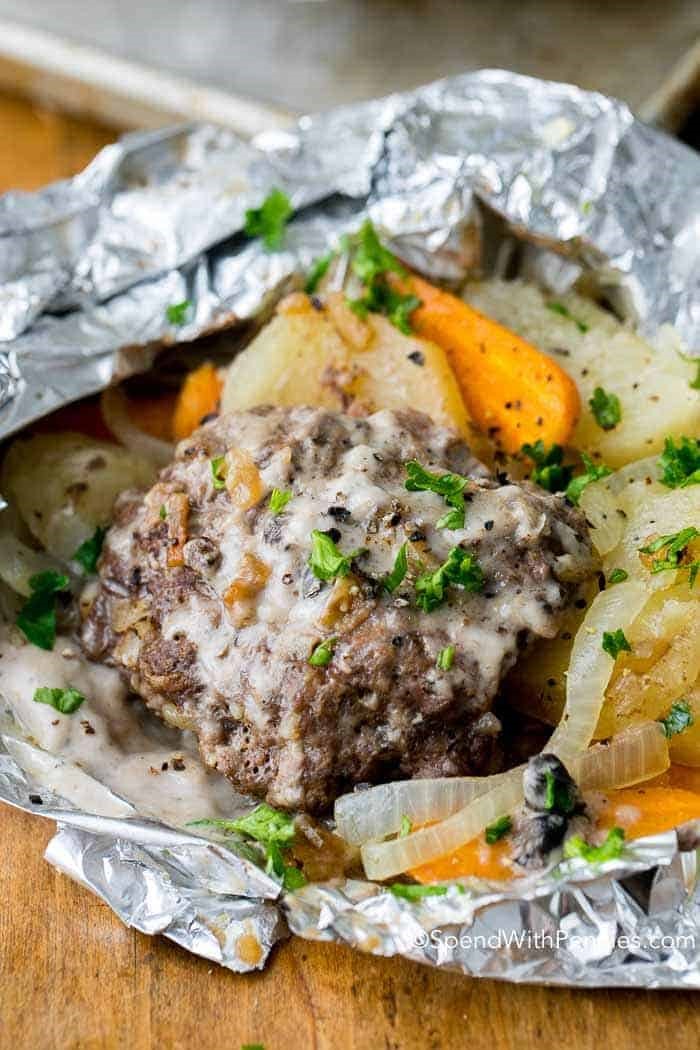
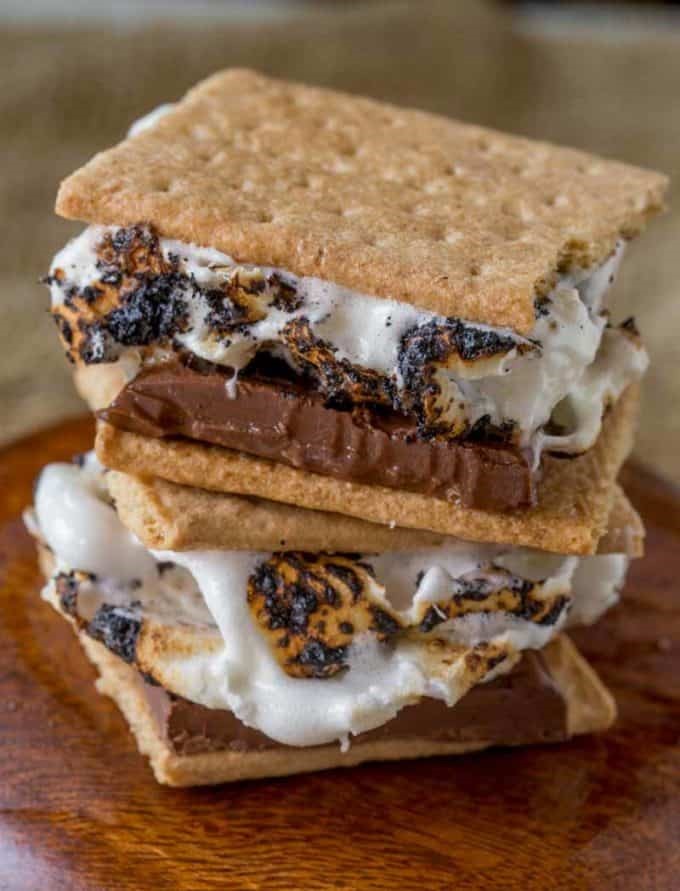
I always consider eating as the most important part of any adventure or trip and a backyard campout is no different. Plan what you want to eat, how it will be prepared and cooked, eaten and cleaned up, as well as food safety. If you are a novice to all things camping, my suggestion would be Hobo Dinners and S’mores (see recipes below). Hobo Dinners, also known as foil packet dinners, can be prepared inside, where food safety is easy to maintain, and stored in a cooler of ice until time to cook. The foil packets can be filled with each person’s favorite ingredients and cooked on a grill or a bed of campfire coals. Once cooked, you eat right from the foil packet, making clean-up easy. Using a paper plate to rest your warm packet on while eating is strongly suggested, especially if cooked in the coals. As for dessert, no camping trip is complete without S’mores. These easy to make treats are a must. A search of the internet will leave you with hundreds of ways to make foil packet dinners and S’mores but our campout is made for the novice. Try my simple versions of these camping favorites found below.
Besides eating, we want our campout to be full of fun. That is why planning for playing/learning is important. Our learning starts at birth. The more we are exposed to different experiences, the more we learn. The sooner we expose our kids to outdoor learning, the sooner they will want to explore and learn more.
You will want to plan activities that are age-appropriate and spark curiosity. If you are a camping novice, stick to the easy stuff. A nature walk or scavenger hunt, even in a small yard, can prove to be quite exciting. For the more experienced camper who is wanting to teach the basics to the next generation, learning to build a firepit, setting up a real tent, leaving no trace, and digging a latrine could all be part of the playing and learning activities. Making nature crafts is another great way to get kids engaged in nature. Supplies from a dollar store can aide in the creations. Catching fireflies in a jar was always one of my favorite activities.
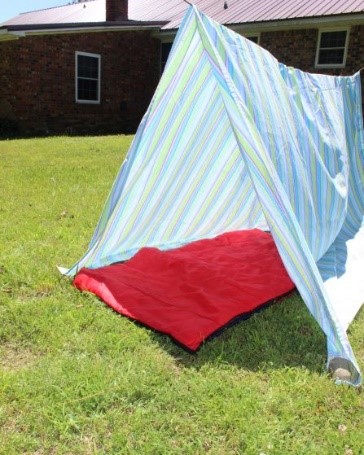
Finally, we come to the sleeping. This is a campout, so a tent would be the preferred sleeping arrangement, but a tent is not required. If this is your first attempt at a backyard campout, you may not have a tent or don’t know one to borrow. Never fear, all you need is a clothesline, an old bedsheet, a tarp, and a sleeping bag or some blankets. My mom had an actual clothesline in the back yard, so all we had to do was throw the sheet over. If you don’t have a clothesline, make one by tying a rope between two trees or poles. To make your tent, simply drape a flat sheet over the clothesline and use stakes or rocks to hold down the corners, forming a pup-tent shape. Lay a tarp or blanket over the ground to keep kids dry and clean and to ensure a safe spot for playing. Because you are in the backyard, there is not a need for protection from the rain. If the weather starts to get bad just go inside and camp a different day.
Getting your kids outside and into nature can be simple, low cost, lots of fun, and no experience needed with a camping trip to the backyard. When planning, remember R.E.P.S. – Rules, Eating, Playing, and Sleeping. Be willing to be flexible and adventurous. With a little planning and a lot of enthusiasm, you can spark your kids’ imagination and curiosity for nature’s bounty and never leave the comforts of your backyard.
Hobo Packets
-
4 small potatoes, peeled and sliced
-
2 cups carrots, chopped
-
1 large onion or 2 small onions, sliced
-
1 lb. lean ground beef (want a little fat in the meat to help with flavor and keep things moist)
-
1 package dry onion soup mix
-
2 Tablespoons olive oil
-
1 teaspoon garlic powder
-
1 can condensed mushroom soup (optional but great addition of flavor if have)
-
salt & pepper to taste
- Wash and prepare all vegetables. Set aside.
- In a large bowl combine beef, soup mix, oil, garlic powder, salt, and pepper. Mix well. Form into 4 equal size patties.
- Spray a 12″x18″ piece of foil with non-stick spray.
- Place 1/4 of the vegetable mixture in the center of the foil. Top with 1 beef patty.
- Add 2 tablespoons of condensed mushroom soup on top of each patty.
- Seal foil packets well. Wrap and seal each packet in a second sheet of foil. This step is very important if cooking in the campfire coals or on a grill.
- Place beef side up on bed of hot coals near the edge of your campfire and cook 35-45 minutes, rotating ½ way through cook time, or until potatoes are tender and beef patties reach an internal temperature of 160 degrees as checked with a food thermometer. You can place a few coals on top of the packets if you wish, but careful not to put too many – otherwise, your meal can burn quickly.
These foil packs can also be grilled at medium/hot heat for about 45 minutes or baked in 350°F oven by placing on a large baking sheet for 35-45 minutes. Whichever way you choose to cook this is an easy, anytime meal. Always cook until vegetables are to your tenderness liking and ground beef reaches 160 degrees when checked with a food thermometer.
Servings: 4
Prep Time: 15 minutes
Cook Time: 45 minutes
Picture and recipe adapted from SPEND WITH PENNIES SITE. By Holly 8-16-2017 “Hobo Dinner Foil Packets (Hamburger & Potato)”
https://www.spendwithpennies.com/hobo-dinner-packs-hamburger-potato/
S'Mores
-
8 sheets graham crackers
-
2 milk chocolate bars, like Hershey’s 1.55oz
-
8 large marshmallows (not mini)
Tools:
bamboo roasting sticks or other roasting forks
- Prepare a campfire (or fire in your fireplace). Allow the fire to simmer down so the logs are red hot embers rather than a roaring fire of flames. A charcoal fire works the same.
- Break one long graham cracker in half horizontally to make two squares. Break the chocolate bar to fit one graham cracker square, leaving the other graham cracker square open to use as the top. Set aside. I like to use regular Hershey bar, two squares per sandwich. They melt much better from the hot marshmallow than the individual mini bars.
- Place a marshmallow on a stick and hold it over the heat, rotating often, until the marshmallow is golden brown (or dark brown or burnt, if you prefer!) and the inside is gooey.
- Remove the marshmallow from the fire and place it on top of the chocolate. Top the marshmallow with the second graham cracker square, mashing together while pulling out the stick. Eat it sandwich style and enjoy a classic treat!
- Makes 8 servings.
- Prep Time: 5 minutes
- Cook Time: 10 minutes
S’mores Picture and recipe adaptations from DINNER THEN DESERT Site. By S. Snyder 6-22-17. “How to make S’Mores (4 Ways)”. https://dinnerthendessert.com/how-to-make-smores-4-ways/