Contact
How to Build a Rain Barrel
A one-inch storm on a 1,000 ft roof generates over 600 gallons of free, soft, nonchlorinated rainwater! Capturing even a fraction of this volume in rain barrels can serve as a cost-effective alternative to using tap water for watering landscapes and ornamental gardens.
There are no restrictions on collecting rainwater in a barrel for gardening or other uses in Arkansas.
What are rain barrels?
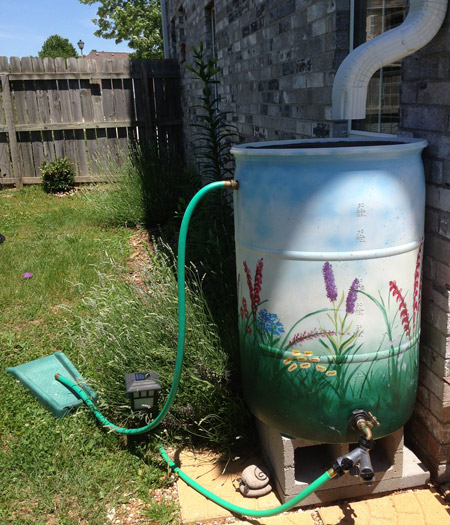 Rain barrels are storage containers placed in areas where runoff flows from impervious
surfaces during a rainfall event, such as the water collected from a roof through a gutter system.
Rain barrels are storage containers placed in areas where runoff flows from impervious
surfaces during a rainfall event, such as the water collected from a roof through a gutter system.
Perfect for Watering Your Landscape
Collected rainwater is great for lawns and ornamental plants. However, due to contamination concerns, take precautions if using rain barrel water for produce.
Tips for using rain barrel water.
Harvesting stormwater with rain barrels can offer many benefits including:
- saving money on municipal water bills
- reducing use of treated water for home irrigation
- lowering peak demands on public water systems
- reducing stormwater runoff volume and velocity
- reduces the amount of non-point source pollution making it into our waterways
How do I build a rain barrel?
Watch our five minute "how-to" video below as a guide.
What tools will I need?
- Jig saw or reciprocating saw
- Drill
- 1" drill bit (spade bit will work but a regular bit bores a smoother hole)
- 1½" hole bit for bulkhead tank fitting and spigot
- Adjustable crescent wrench
- Staple gun
- Scissors or utility knife
- Food-grade plastic, 55-gallon barrel or other receptacle
- ¾" hose bibb (MIP threaded inlet) (plastic or brass spigot)
- ¾” bulkhead tank fitting with 1½" mounting hole Bulkhead tank fitting
- ¾" x ¾" pipe-to-garden hose connector
- Teflon® tape (plumber’s tape)
- Fiberglass window screen
- Bricks or cement blocks
Steps to Building a Rain Barrel
Step 1: Preparation. Mark all cuts and holes to be drilled on your clean 55-gallon barrel. The overflow hole can be located on either side of the barrel and should be at least 2 inches from the top edge of the barrel. The spigot hole should also be 2 to 3 inches from the bottom edge of the barrel.
Step 2: Cutting and drilling. Drill a 1" pilot hole in the top of the barrel to start your saw blade and cut the top out of the barrel using a jig saw or reciprocating saw. Make sure to leave at least a 1" rim to secure the fiberglass screen later. Next, drill the overflow hole at the top of your barrel with a 1" drill bit. Then drill the spigot hole using a 1½" hole bit. Use a utility knife to smooth out the plastic burrs around all holes and cuts. Finally, clean the inside of the barrel to remove plastic shavings.
Step 3: Inserting fixtures and fittings. Insert the bolt-shaped end of the bulkhead tank fitting into the barrel from the inside, keeping the rubber gasket between the “bolt” and the inside of the barrel. The plastic washer fits between the outside of the barrel and the nut of the tank fitting. These fittings have left-handed threads, so tightening seems backwards. Wrap the spigot in Teflon® tape and insert it into the bulkhead tank fitting. For the overflow, the hose-to-hose connector will screw directly into the plastic barrel in the 1" overflow hole. If desired, you can use a 1" internal diameter metal washer between the barrel and the overflow adapter to give more support to the fitting.
Step 4: Screening the top of your barrel. Cut your fiberglass screen large enough to cover the entire top of your barrel to prevent mosquito breeding. Staple one edge of the screen to the rim of the barrel (12 o’clock), stretch the screen smoothly across and staple the screen on the opposite side (6 o’clock). Staple the screen at 3 and 9 o’clock, then fill in with additional staples around the rim of the barrel, keeping the screen tight as you staple. (Bungee cords can be used in place of staples to make it easier to clean and winterize the barrel. Ensure a tight fit to prohibit insects from entering the barrel.)
Trim off the excess screening material with a utility knife or scissors to give it a clean appearance. If stapling the screen is not an option, the screen can be wrapped over the edges of the barrel and fastened down with bungee cords or straps.
Step 5: Installing your rain barrel. Your rain barrel needs to be raised above the ground to allow access to the spigot and provide enough head pressure to water your plants through gravity flow. Cinder blocks or landscape blocks work well as a stable means of raising rain barrels off the ground.
Step 6: Cutting the downspout. Once you know the height of the barrel, it is time to cut the downspout. Dis connect the elbow at the bottom of your downspout. Hold the disconnected elbow up to the downspout to mark where to cut the downspout to provide at least 2 inches between the elbow and the rain barrel so the barrel can be easily removed for future maintenance. Cut the down spout at the line and reconnect the elbow to the downspout.
How do I maintain my rain barrel?
Additional Rain Barrel Resources
| FSA9534 | Building Rain Barrels to Harvest Rainwater (color) |
| Using Rain Barrels to Protect Water Quality with John Pennington, Washington County Extension Agent |
|
| UAEX Web Page |