Perfect Pie Crusts
How to make the perfect pie crust for all your holiday pie baking.
 Nashville, Ark. – Holidays and homemade pies, fresh from the oven, just go together.
While Thanksgiving seems to be the holiday that pies make their grand entrance, a
delicious slice of pie is great anytime of the year!
Nashville, Ark. – Holidays and homemade pies, fresh from the oven, just go together.
While Thanksgiving seems to be the holiday that pies make their grand entrance, a
delicious slice of pie is great anytime of the year!
Fall does seem to bring out the pie maker in all of us. Maybe it is because it is the end of the harvest season with fresh apples, sweet potatoes, pumpkins, and pecans. Many people are intimidated by making pies. Most of the concern comes from the base of the pie, the pie crust. While you may resort to purchasing a ready-made pie or pie crust, it is super simple to make a flaky pie crust just like grandmother did.
All You Need is 3 Ingredients
The internet and recipe books offer many recipes for making pie crust. Some suggest adding salt, sugar, eggs, milk, vinegar, and other ingredients. However, there are just three basic ingredients needed in making a perfect pie crust – flour, fat, and water. The most basic recipe is a 3-2-1 recipe. 3 parts flour, 2 parts fat, and 1 part water.
Making pie crust from scratch doesn’t require a lot of equipment. You will need the basics – bowl, measuring cups, rolling pin, a hard surface (countertop), pie plate and knife. Other equipment you may want include a pastry blender, pastry cloth, pie weights, and fancy cutters. However, in all honesty a great pie crust can be made with just a bowl and your fingers.
Start with the flour, three parts for the basic recipe or 1 cup. All-purpose flour is all you need. It has the perfect amount of gluten (protein found in certain grains). Gluten provides structure for the pie, and creates a tender, flaky crust. Cake flour has too little gluten and bread flour has too much gluten. Self-rising flour has added salt, baking soda and baking powder. It can be used, but for the most basic pie crust, all-purpose works great.
The second part of the recipe is fat, two parts or 2/3 cup. Fat can be lard, butter, shortening, vegetable oil or a combination of fats. Fat has a dual purpose. 1) It coats the flour to prevent excessive gluten formation. 2) During baking, as it melts it releases little pockets of steam to create flaky, tender crusts. Solid fats will create a flakier crust than melted or liquid fats. Chilled fats provide the best crust. If using butter, make sure it is cold. Keep it in the refrigerator until ready to add to the recipe.
You can use your bare hands to cut in the fat. Most cooks prefer to use a pastry blender. One with a sharp edge is best for cutting in cold butter. If the fat is soft, the tines of a fork can be used to cut-in the fat. The idea is to get the fat incorporated in the flour until small pea size pieces are distributed throughout.
The final ingredient is water, one part or 1/3 cup. It is the glue that holds everything together. Always start with a small amount of water and add more as needed. The water amount used is sometimes controlled by the weather. A high humidity day will use less water than a dry, low humidity day. Add just enough to moisten the flour.
Cold water is best, so it doesn’t melt the fat. Remember the function of fat is to melt during baking to create steam pockets. Some recipes call for milk, egg, vinegar, or a combination of liquids in place of water.
Continue to add the water until a soft dough forms. Less is more. You want to form a smooth, pliable dough. If it is too dry it will not hold together. Form the dough into a ball shape. You may want to wrap the ball of dough and refrigerate for about 30 minutes. Letting the dough rest allows the gluten to relax and gives the flour time to absorb the water evenly, usually making it easier to handle. If you allow it to rest in the refrigerator longer than 30 minutes, you may need to let it sit at room temperature to warm enough to make it pliable.
Now it is time to roll out the dough. You can use a pastry cloth, wax, or parchment paper or even a clean, sanitized countertop. Sprinkle a light coating of flour on the surface and on the rolling pin. Use steady pressure on the rolling pin and roll from the center out. You can rotate the
dough to maintain a circular shape. If the dough starts to stick, put a little flour under the dough as you rotate it. Roll it out to about 1/8-inch thick and to a size that is about 2-inches larger than the pie plate.
Pie plates can be glass, metal, or disposable aluminum pans. Glass is preferred. They produce a brown, crisp crust that is not soggy on the bottom. You may need to reduce the baking time or temperature with a glass pan. The disposable aluminum pans create the most challenge to even baking. However, any of these will produce a great pie crust with a little practice.
Now you are ready to transfer the crust to the pan. There are several methods that work well. Fold the dough in half and then into fourths, pick it up and lay it into the pie pan and unfold. Allow the crust to sink down into the pan. Gently form it to fit the inside of the pan. Another option is to roll the pie crust around the rolling pin, pick it up, and gently unroll it over the pie plate. Be careful not to stretch the dough. If you rolled the dough onto wax paper, you could turn the pie plate upside down on the crust and flip the paper and pan right side up together. Experiment and find the option that works best for you. If the dough tears, don’t fret! Use a little water and gently pat it back together.
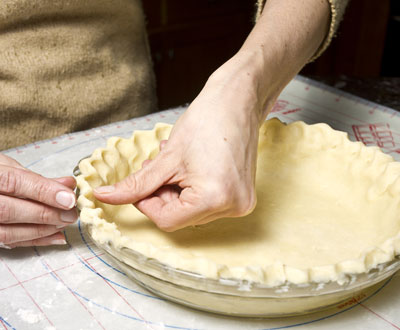
The final step is to make it pretty! Start by trimming the crust. It should be about an inch larger than the pan. Turn under the raw edge. If you are making a double crust pie, do not turn under at this point. Add your filling. Lay the top crust on top. Trim both to about 1-inch larger than the pie plate, turn under and flute the edge. There are several ways to flute the edge. The internet has several options, or you can contact the Howard County Extension Office and ask for the handout, “Pie Pastry Tips.
Some recipes will recommend prebaking the crust. Cream pies are an example. The filling is cooked before adding to the crust. Before prebaking, prick the crust with a fork to allow steam to escape and prevent shrinkage. You can line the crust with parchment paper and use pie weights or dry beans to prevent shrinkage. After prebaking, remove the weights and paper
For double crust pies, such as fruit pies, vent the top with a knife or decorative pastry cutters. Double crust pies are a two-part process. Most pie crusts are baked in a preheated 425°F oven. Place the pie on the lower third rack of the oven for about 15 minutes. The high temperature and lower rack position kick start the baking of the shell which helps prevent a soggy bottom. After 15 minutes, place a cookie sheet under the pie and move it to the middle of the oven. Reduce the temperature to 350-375°F. Follow your recipe. Remember, all ovens vary. If the crust starts getting too brown around the edges, cover with strips of foil. The crust is done when it is a nice golden brown.
Making pie crust from scratch is easy to do and anyone can make a great one. Follow the 3-2-1 recipe. Making a crust from scratch is less expensive than premade crusts, plus there really is no comparison when it comes to taste and texture.
For more information on baking during the holiday season, contact the Howard County Cooperative Extension Service at 870-845-7517 or email me at jince@uada.edu. You can also visit our office located on the second floor of the courthouse. The Cooperative Extension Service is part of the University of Arkansas Division of Agriculture.
Recipe of the Week - Easy Homemade Pie Dough
This recipe is a great substitution for the basic 3-2-1 recipe. It uses butter as the fat and adds a little salt for flavor. The end result is the same – a tender, flaky crust that is super easy to make! This recipe will make enough dough for a double-crust pie or two single crust pies.
-
2 ¼ cups all-purpose flour
-
Pinch of salt
-
Pinch of sugar
-
¾ cup cold butter, cut into cubes
-
4-5 Tablespoons cold water
-
Sift or stir flour, salt, and sugar into a large bowl, add butter and cut into the flour (using pastry blender or clean fingers) until mixture resembles coarse crumbs (the size of a small pea.)
-
Sprinkle with water (one tablespoon at a time) just until dough starts to come together.
-
Move to a lightly floured flat surface and knead lightly into a round ball.
-
Wrap dough in plastic and refrigerate for at least 30 minutes before using.
By Jean Ince
County Extension Agent - Staff Chair
The Cooperative Extension Service
U of A Division of Agriculture
Media Contact: Jean Ince
County Extension Agent - Staff Chair
U of A Division of Agriculture
Cooperative Extension Service
421 N. Main St, Nashville AR 71852
(870) 845-7517
jince@uada.edu